Dolphin Platform Web Frontends with Polymer
For the Dolphin Platform release we plan to offer several demos and tutorials as a starting point. Currently I’m working on a simple chat app that contains a JavaFX and a web frontend. The web frontend is done by using Google Polymer and web components. In this post I will give a preview how you can create web applications with the Dolphin Platform by using Polymer.
All the main concepts are already described in the post about JavaFX clients and in this post I will show you that you can reuse all the concepts for a web application.
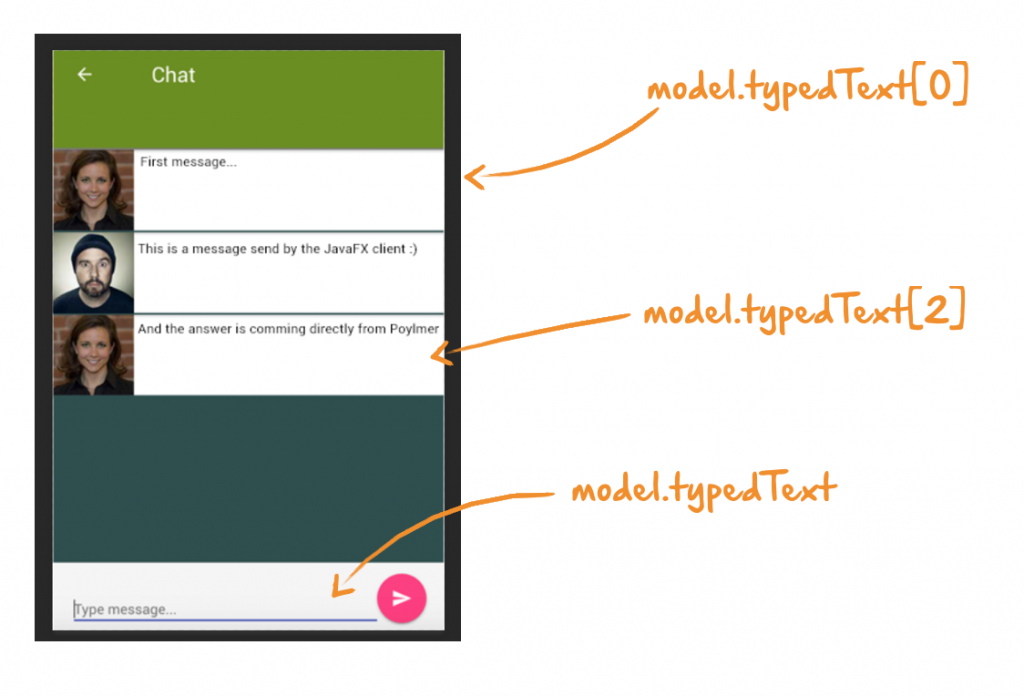
The following picture shows how the final application will look like:

To create a client that can communicate with the Dolphin Platform server a client context is needed. In an web application this can simply be done by defining a global JavaScript value:
<script>
  clientContext = dolphin.connect('http://localhost:8080/dolphin');
</script>
As we use web components when creating an application by using Polymer all view elements of our application are defined as components. In the chat example one chat view is defined as a Polymer based web component. For such a component the minimum code looks like this:
<!DOCTYPE html>
<html>

<dom-module id="chat-thread">

    <style>
        THE INTERNAL STYLE
    </style>
    <template>
        THE HTML TEMPLATE
    </template>
</dom-module>
<script>
    Polymer({
        is: "chat-thread",
    });
</script>
Once this is done you can simply use the component in your web application as a custom tag:
<body>
  <chat-thread></chat-thread>
</body>
To create a web component that acts as a Dolphin Platform you only need to add one more line of code:
//...

<script>
    Polymer({
        is: "chat-thread",
        behaviors: [clientContext.createBehavior('ThreadViewController')],
    })
    ;
</script>
Polymer supports extending custom element prototypes with shared code modules called behaviors. The Dolphin Platform client API provides such a base behavior and therefore you can connect a web component with a Dolphin Platform controller by only adding one line of code. The ThreadViewController is the server side controller for this view. The code of this Java class looks like this:
@DolphinController("ThreadViewController")
public class ThreadViewController {

    @DolphinModel
    private ChatThreadBean model;

    @Inject
    private BeanManager beanManager;

    @Inject
    private ChatStore chatStore;

    @PostConstruct
    public void init() {
        model.chatIdProperty().onChanged(e -> {
            //New Chat
        });
    }

    @DolphinAction
    public void send() {
        //New Message
    }

}
I don’t want to discuss the Dolphin Platform controller API here and therefore all the methods of the controller are empty at the moment. Here it’s important to know that the controller instance and the view share one model that is defined by the ChatThreadBean class:
@DolphinBean
public class ChatThreadBean {

    private Property<String> chatId;

    private ObservableList<ChatMessageBean> messages;

    private Property<String> typedText;

    public Property<String> chatIdProperty() {
        return chatId;
    }

    public ObservableList<ChatMessageBean> getMessages() {
        return messages;
    }

    public Property<String> typedTextProperty() {
        return typedText;
    }
}
As you can see in the code the model contains a chat id, the typed text and a list of all chat messages that should be shown in the chat thread. Let’s have a look how we can use this model on the client.
By adding the Polymer behavior the Dolphin Platform model will automatically be injected in the component context. It is stored in the JavaScript model value. This means that the following JavaScript call will show a dialog that contains the current typed text:
alert(model.typedText);In addition Polymer defines a binding API this is automatically used by the model. Thanks to this you can simply bind your model or parts of your model to HTML attributes in the web component template by using the mustache syntax. here you see how the typed text is bound to the input field in the chat view:
<paper-input class="flex" label="Type message..." value=""></paper-input>Easy, isn’t it?
Thanks to the modularity of web components you can even go deeper and use your model in sub components. In the chat example each message in the chat is defined by a web component. To do so we created the custom component chat-message that defines how one chat message should be visualized. Now we can define the complete chat by only 3 lines of HTML code:
 <template is="dom-repeat" items="">
    <chat-message message-data=""></chat-message>
 </template>
The don-repeat elect is a special Polymer elect that add it’s content for each item in a given list. As we said earlier all the chat messages in our model are defined as a list. This list can easily be accessed by calling model.messages.
If you already read the post about JavaFX clients you might notice all the parallels. By using the Dolphin Platform API it’s really easy to create interactive and modern clients for several platforms without loosing the control of the UI.
 Hendrik Ebbers is a co-founder of Karakun AG and lives in Dortmund, Germany. He is the founder and leader of the Java User Group Dortmund and gives talks and presentations in user groups and conferences. His JavaFX book "Mastering JavaFX 8 Controls" was released 2014 by Oracle press. Hendrik is JavaOne Rockstar, JSR expert group member and Java Champion.